Our latest DIY project for the apartment is finally finished! It took a long time, and a lot of scattered afternoons to get it done, but it was well worth the time and effort. We now have a door transformed to both a table and a piece of artwork.
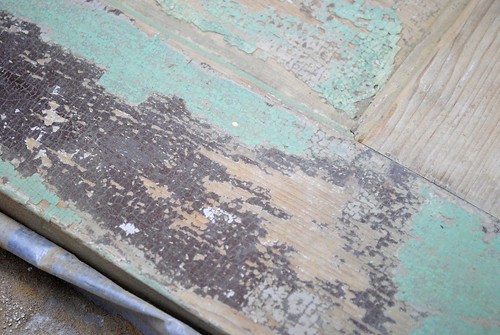
You see, last winter an 1850s era carriage house collapsed next to our old apartment building. It was owned by our landlord and we were given the go a head to salvage a few things if we would like (obviously done after the city had demolished the building so it was safe to be around). We had always loved the look of old doors and thought this would be a great opportunity to salvage one...so we did. Here is the door before a lick of work was done.
Okay, that is slightly misguided...we'd already removed the old hardware, which was a long project on its own due to the insane amount of rust.
For almost a year the door lived on the back porch of our old apartment building until we moved to our new place and had to decide whether or not to bring it along. You see, it is a rather giant, heavy, solid door. After doing some thinking, we decided it would make a nice table that we could set up whenever we needed it but not have to keep up at all times (we don't usually have reasons to sit at a table that seats 6-8 people).
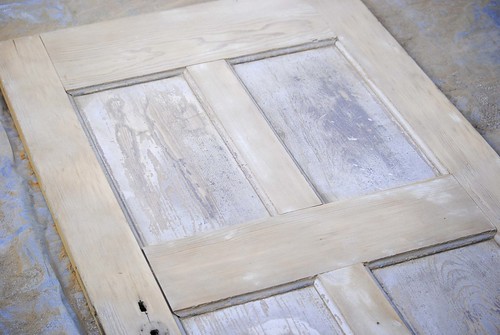
Once the nice weather finally hit, we were able to get started. We started by doing a lot of reading about refinishing old painted surfaces, since there is always a chance that the paint may contain traces of lead. So, no worries, we took the necessary precautions while doing the work.
First we sanded the door. We didn't bother to get all of the paint off, there were quite a few various layers, but we got most of it off so it would not flake.
We left more paint on the side that would be the "art" side and less on the "table" side.
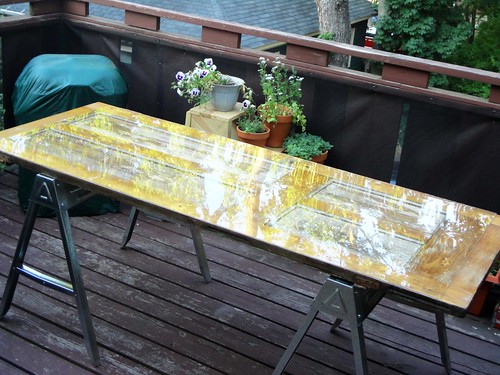
After all of the sanding, it was time to coat it. We decided on a clear polyurethane coating so the natural color of the wood would shine through, rather than using a stain/polyurethane combination. We carefully wiped down the door of all leftover sanding dust and loose paint chips and then started coating it. This process took an excessive amount of time as it kept raining, causing us to do one coat on one side and then bringing the door in after drying, rather than putting on the second coat (we did two coats on each side).
The next major piece of the table puzzle was to secure a piece of acrylic to the table surface in order to create a nice and smooth surface for eating. We did some careful reading about cutting down, drilling starter holes, and screwing into acrylic as we definitely did not want to crack it. We learned that you should go slow and spritz the drill bit or screw with cold water to keep the heat of the work from melting the acrylic.
When we finally finished, we sat it on top of its saw horse legs (that we had previously attached some grippers to so the top wouldn't slide around), and this is how she looked.
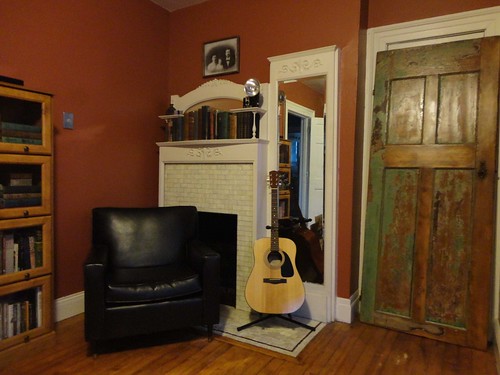
It is a little difficult to see the actual door under the acrylic as the sun was in just the wrong spot. Ah well, you get the idea (we'll post another picture on a less glaring day). Here's a picture of the "art" side of the door.
It is leaning up against one of the closets in the office. The closet holds the folding chairs for the table and the saw horse legs...so the door doesn't block anything that we typically need access to, which is nice!
Have you finished a long project lately? Taken anything from one thing to something entirely different?